Tampilkan postingan dengan label grow. Tampilkan semua postingan

Sabtu, 25 Juni 2016

tom tato aquaponics video

,

 tom tato aquaponics video


It sounds like something from a science fiction film, but a plant which produces both potatoes and tomatoes has been launched in the UK.
The ‘TomTato’ can grow more than 500 sweet cherry tomatoes above ground, while beneath the soil it produces white potatoes that are suitable for boiling, roasting or turning into chips.
Horticultural mail order company Thompson & Morgan, which is selling the plants for £14.99 each, described their new product as a “veg plot in a pot”.
The hybrid plants are not a product of genetic engineering, but are each individually hand-grafted. Like potatoes, tomatoes are members of the nightshade family (Solanaceae), which makes them compatible for grafting.
Grafted potato/tomato plants have been around for decades, including from some small British nurseries, but Thompson & Morgan say this is the first time the plants have been widely produced commercially in the UK.


D. Koster Share this article on Facebook to help me with blogging to use this link


Aquaponics - Commercial aquaponics - Hydroponics - Grow bed


Read more

Jumat, 10 Juni 2016

Grow Cabbage In Your Home Some Basic Tips

,
Cabbage is generally a cool weather crop. There are quite a few varieties available in the market viz Green Cabbage, Red Cabbage, Savoy Cabbage, Pointed cabbage, etc.,


Cabbage can be grown from the seeds easily. Sow seeds one inch deep into the soil. Spacing is very important in growing cabbage two seedling should not be very close to each other.

Generally it is advised to keep the spacing 6-12 inches apart. Another trick in the book is to harvest alternatively to give each plant enough space to grow.

Check your soil pH before planting the seeds. An ideal pH range is 6.5 to 6.8. Lower pH can be prone to club root diseases. To increase the pH of the soil try adding lime along with the soil.

It is important to choose the variety of cabbage wisely and as per your local environment. For example, if you are in cooler climate you can choose slower maturity variety and can grow huge heads, but in case you are in warmer climate it is best to go for fast-maturing variety and grow in the springtime.

As you may have already experienced, cabbage requires regular feeding and a good amount of sunlight. In hot summers provide temporary shade to the plants.

For a good cabbage head you need to maintain a constant level of moisture. Water regularly. Uneven watering can make the cabbage head crack. Check out this watering guide before start giving water to the plant.

Applying mulch and mixing compost with soil can provide the solution. Once the new leaves began to emerge apply fertilizers such as fish emulsion, blood meal, etc., A compost made of tea can be very helpful to the plant. It provides the much needed nitrogen to the plant in case the leaves are turning yellow.

Cabbage is one of the vegetables that is very much prone to pests and diseases. One of prominent sign is holes in the cabbage leaves. There are so many insects such as cabbage loopers, slugs, aphids, root maggots, etc., some most frequent diseases include club roots, yellow leaves, black rots, etc., though the variety of problem differs very much and their particular solutions can vary, one of the general solution is to go for companion planting. In case the plants are already attacked by some molds or fungal diseases, it is wiser to remove the plant. Also, crop rotation prevents many of the pests.

You can be sure that the cabbage is ready for harvesting once you can feel their head become firm. Cut the head with a sharp knife from the stem. You can refrigerate the heads for two weeks.

Raw and chopped cabbages can provide a great compliment with barbecue and seafood. There are so many good recipes involving cabbage is present in many cultures. Cabbage is good source for vitamin A, C and Iron.


What is your experience regarding growing Cabbage? Do you have any trick to share? Any advice will be welcomed.
Read more

How To Grow Transplants In Your Own House

,
Today we are going to discuss about how you can grow Transplants (seedlings) in your house and use it to grow plants in stead of growing directly from the seeds. Now, you must be wondering why we should take the pain of preparing transplants when we can easily grow plants directly from seeds. So let me tell you this, there are two major advantages of growing transplants in stead of growing plants directly from the seeds.

Firstly, it drastically reduces poor germination possibilities. Unlike directly growing from the seeds in this case proper care is taken to every seeds so that each of them gets most favourable condition for germination. So the seed wastage is greatly reduced.

Secondly, when you transplant the seedlings to the permanent spot where they are meant to grow Chances of survival of the plants are increased greatly as they become adaptive to the climate outside. It most of the cases when we grow from the seeds this is the time when most of the plants die as they try their best to adapt to the surroundings.

So where do we start?

To prepare the transplant you first need to have high quality seeds. You can buy from your nearby nursery shop or you can use your own. The seeds from commercial supplier are generally are of superior quality as it is prepared under professional guidance. If you are planning to buy the seeds please refer to the dates mentioned in the packet while buying.

The next thing which is very very important in transplanting is the media or the soil. Different mediaare used, to prepare the transplant. But while choosing, remember it should allow air and water to reach the seed, and it should provide nutrition in those early times.

The next question is should you use sterile or normal media. Well, in most of the cases the media used by professional gardeners are sterile in nature. It reduces the chance of fungal or any other diseases. You can easily find sterile media from your nearest garden shop. One of the major drawback about using sterile media is that it contains almost no nutrient. So you need to transfer the seedlings in early stages or they would die.

Once you have finalized about the seeds and growth media it is now time to select the containers. The most popular is plastic seedling trays. This form is widely used by the gardeners and nurseries across the world. It can save you lots of time and space by selecting these them than going for individual pots. You can also choose to use used egg cartons or paper cups. Sometimes tiny pots made up from peat moss or coconut coir is also used. Now that you have selected your final ingredient, put some mixture (growth media) in every pot or compartment of the tray, sow the seed and cover it with some mixture. Add little bit of water to keep the mixture moistened. Keep the tray in a place inside your house and wait for the seeds to germinate.

Once they germinate, put the tray in a place where the tray get sunlight. It will ensure proper growth for the seedlings. After two to 4 weeks (depending on the plant and the size of the seedlings) transplant them in their permanent spot.


Hope you have liked the article. Share your thoughts by using the comment box below:
Read more

Selasa, 07 Juni 2016

New Grow Bed Grow Bed Stand

,
In this post, I will explain how I construct my grow bed stand. Like most DIY-ist out there, improvements from previous design is a must. My previous stand was made out of slotted angle iron and was designed badly with various newbie flaws. The new grow bed stand will also be made from angle iron but without those flaws.


Some Tips on Slotted Angle Iron...

Before I talk about my grow bed stand construction, I would like highlight a few things I learned when constructing my previous growbed stand:

Notice that a slotted angle iron bar consists of segments repeated throughout its length. Each segment is precisely 3" long. The red lines in the picture below marks the locations where cuts should be made. Due to this, it is important that all the dimensions in your design are in multiples of 3 inches. For example: 21", 30", 9", 63", etc...

Cutting points
When buying them, most hardware shop sells them in 10 feet bars only. That means one bar consists of exactly 40 repeated segments - no little extras at either ends! Before going to the shop, write down the number and lengths of all the pieces needed in your design on a piece of paper then plan out a cutting strategy that uses the least amount of full length bars and minimum wastage. At the shop, they will either let you use their cutting tool to cut them yourself or you can provide them with your measurements and have them cut them for you.

When cutting them, try to cut them precisely across the center of the oval hole at the cutting point. Too much error may prevent the holes from aligning properly when forming corner joints. For the sake of precision, I prefer to cut them myself. I dont trust the hands of others.

A cut made at the cutting point
A worker at the hardware shop I purchased these said that my cutting style is wrong. Well, I learned this tip from a website of a company that manufactures slotted angle iron!


Grow Bed Stand Construction

Materials:
4 x 30" slotted angle iron
4 x 21" slotted angle iron
6 x 36" slotted angle iron
4 x angle iron rubber caps
16 x corner brackets
60 x nuts & bolts

* notice that the lengths of all the angle iron are in multiples of 3".
* total angle iron purchased: 4 x 10 feet bars


I didnt took any pictures during assembling so heres a picture of the final product:


Pretty neat isnt it?
It looks a lot better than my previous stand. All the corners looks perfectly square. It looks like I could even lay a piece of plywood at the bottom section.


Thanks for reading!
Read more

Senin, 06 Juni 2016

Why you should grow strawberries in Coir

,
Which growing media works best for growing strawberries? Well, there are a few options including soil. People have grown strawberries successfully in media like Rock-wool, Perlite or Bark. Here in this article I want to talk about coconut coir as a media for growing strawberries and why it is the best of them all.


strawberry in coconut coir

Benefit of coir over soil:

The following are the benefits of switching your strawberry cultivation from soil to coconut coir:

Traditional way of using soil as a growing media for strawberries has one major dis advantage and that is the pathogen problem. Unlike normal soil coconut coir does not infested with any harmful fungi.

On the contrary coir are enriched with trichoderma. Research has shown in the past that these fungi help reducing anthracnose disease in strawberry plants and thus work as a great substitute for traditional chemical uses in strawberry field. As a result you do not need to fumigate or use any other such methods which pollutes the environment to disinfect the media.

Coconut coir are high in lignin. This organic compound helps in the development of beneficial bacteria which in turn reduce the propagation of harmful ones in the media. These beneficial bacteria remain in symbiotic relationship with the plant and thus increase the overall productivity.

The water retention capacity of the coir go very well with the plant. Planting strawberries in coir requires less frequent watering and also eliminate the problem of water logging (due to its excellent drainage capacity).

strawberry in coconut coirStrawberries require considerable amount of oxygen in their root zones. So it is inevitable that the media for growing strawberries should have a good aeration property. That is one of the reasons that coconut coir is considered an ideal medium for growing strawberries. The high level of aeration and fantastic drainage property encourage the plant roots to develop its full potential.

Vertical towers are becoming more and more popular these days among gardeners especially in urban areas. Using coir in place of soil will also make the towers light weight and easier to transport.

Besides the high buffer capacity, coir also ensure slow release of nutrients for extended period of time and thus optimize plants growth.

Due to these attached benefits coir have been broadly in use in green houses. They have increased the productivity quite a fold.

Strawberries require calcium for their growth. So before buying any coir please check its labels. Normally coir dont have a lot of calcium in it. But as an amendment some companies have decided to add calcium in their buffered coir media. If your coir dont have added calcium you might need to add gypsum or perlite to make it suitable for growing strawberries.

A potting mix consisting of coconut coir, perlite and compost is ideal for growing strawberries. One of the best combinations is 50% coconut coir with 30% perlite and 20% compost.

For other information about growing strawberries check out our earlier article.


What do you think about the article? Express your views by using the comment box below. 

Dont forget to read:
Growing Strawberry: Some Points to Remember
Coconut Coir and its use as a Soil-less Growth Media
Read more

Jumat, 03 Juni 2016

How to Grow Bitter Gourd

,
The name of this plant is such due to its bitter taste of the fruit. Though many people found this very disgusting, many people around the world like this plant for its unique flavour. Below are some of the important facts about growing Bitter Gourd:

Soil: Though it can grow in any type of soil from sandy loam to clay loam, a fertile, well drained soil with a pH of 5.5 to 6.5 is ideal. Add a bit of compost at the time of soil preparation to feed the plant.
Once the plant starts bearing flowers you need to add fertilizers to tackle its voracious appetite. Bone meal, blood meal or some fish emulsion can be very good choices for this.

Environment: It is a plant of the humid weather condition, with day time temperature ranging between 70 to 80 degree F. 6 hours of direct sunlight is very much necessary for optimum growth of the fruit.

Planting: Sow 1 or 2 seeds at 2 cm depth. Though you can also use trays to germinate them, they generally dont transplant very well. They are very fast growing vines. So give them something to climb on to. It is best to plant them near the fence.
Bitter gourd requires lots of water. Regularly water the plant and you will get flowering very soon (within 5-6 weeks). As a matter of fact with some of the varieties you can get mature fruits within 3 months of planting.

Care: Little bit of pruning in the form of removing the growing tip of some lateral branches is required. Doing so will stimulate the higher branches and will produce higher yield.
Fruits are susceptible to various rots. One of the main ways to reduce the problem is to use trellis. Trellis the veins, and it will definitely reduce the rotting problem. You will get hanging fruits and harvesting would be much easier. In case you are not using them, cover the soil with mulch of dry leaves to protect the fruits from getting moist.

Harvesting: Bitter gourd is a member of the Cucurbita family and like all other members of the family it also bears male and female flowers. It is the male one which blooms first, followed by the female ones.
The degree of bitterness varies as per the maturity of the fruit. Smaller and immature fruits are more bitter than the matured ones. Harvest them when they are 4 to 6 inches long and are green.
You have to pick the fruit when they are still green and firm. Fruits which become spongy or yellow are over ripen.

Store them in a plastic bag inside a refrigerator. For more tips on storing of vegetables use this link.


What do you think about the article. Share your thoughts:
Read more

Kamis, 02 Juni 2016

How to Grow Tomatoes Growing Tomatoes With Simple Tips Tomato Growing Tips

,

growing tomatoesTomatoes are one of my favourite vegetable. It is very easy to grow as well as enjoyable to eat. Though technically tomato is a fruit of the plant but we all prefer to call this a vegetable. If you take proper care of your tomato plants, the yield can be overwhelming.

Scientific name : Lycopersicon sp

The tastes of tomatoes are very sensitive to the surroundings. So rather than focusing on only one variety, it is always sensible to try 3 to 4 varieties. It will help you find out which is the best variety suitable to your locality.

Tomato Plants and Sunlight:

Keep your tomato plant to a place where the plant will get plenty of sunlight. The fruit formation of a tomato plant requires at least 6 hours of direct sunlight. You can read more about the effect of sunlight on different plants in our earlier article here.

Tomato Cage for Supporting A Tomato Plant:


A Tomato plant needs support for its growth. You need to build cage or stakes at the time of planting. Staking keeps fruits off the ground whereas a tomato cage help the plant to hold its upright position.

Tomatoes require plenty of water, specially during the summers. But while watering a tomato plant do not wet the leaves or the stem of the plant. Always put water directly into the soil near the roots(see watering guide for details).

Pruning Tomato Plants:

Take out any shoot that grows between the stem and main branches, these shoots always hinder the fruit growth. In gardening this process is called pruning of plants. With the same logic cut off the tip of the plant. It will help the plant to become more bushy with much more fruits.

How To Plant Tomatoes:

You can start either from seed or through seedlings purchased from nurseries. If you are starting from seeds, it is recommended to use seedling trays.fill these trays with potting soil and sow the seeds there. It is important to keep the trays indoor until the seeds germinate. Once they have grown up to 15- 20 cm you can transplant them outdoor. See transplantation techniques for detail.

Before planting the seedlings make the soil ready by tilling and mixing compost or manure with the soil. It is recommended to plant the seedlings 2ft apart.

It is necessary to keep the soil fertile. Add fertilizers two week prior to picking and two weeks after the picking.


Tomato Pests and Diseases:

Tomatoes are particularly susceptible to many pests and diseases. Horn-worms, Aphids, white-flies are few of the tomato pests which can reduce the production of the plant. Late blight (specially during monsoon) and distorted leaves are the common diseases to the plant. It is always wise to plant basil along with your tomato plant. Basil is a fantastic companion plant for tomatoes. It will help in distracting little pests from your tomato plant. This type of planting is called companion planting.

Harvesting Tomatoes:

Never pick tomatoes in green condition they will rot before get ripe. Leave them on the vine as long as possible. Never try to refrigerate ripe tomatoes. It will spoil the texture and taste of the perfectly ripe home grown tomato which is best eaten sun warm from the kitchen garden.

I hope these simple tomato growing tips helped you in growing tomatoes. Do these simple steps and you can enjoy your home grown favourite vegetable and also find the distinctive flavor and taste which are definitely missing when you buy those from the stores.


Thanks for reading. Keep your comments coming.


Read more about tomatoes: 
FAQs About Tomato Growing
Top 8 pests of Tomatoes
Simple steps to save tomato seeds 
Top Five Companion Plants For Tomatoes
Read more

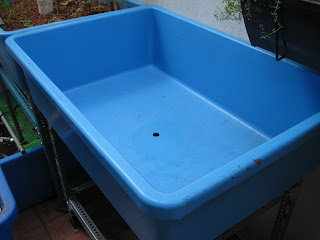
New Grow Bed Putting it all together

,
With all the components ready, I assembled the new grow bed today. Im too tired to type now, so Ill just present some pictures along with some descriptive text on the construction process.

I begin by positioning the grow bed at the desired position.

Positioning the grow bed
 Next, I fixed the strainer pipe at the bottom of the tank

A 25 mm hole drilled at the center
Fixed a bulk head fitting together with the strainer holder
Strainer pipe held securely by the strainer holder
I then filled the bottom 3 inches of the grow bed with river pebbles. This is to provide extra drainage at the bottom to minimize anaerobic zones.

The gap in between the strainer pipe and the tank floor is narrow enough to not let any pebbles through.
I used water as a guide to help me level the pebbles.
 Next was the washing of 3 bags of new expanded clay balls. Bought them for RM70 per bag.


I learned a convenient way to wash them from the Backyard Aquaponics forum. Just fill the bag with water until full. Shake it. Then poke some holes to drain the water out.

Make a hole at one corner and insert a hose into the bag. Start filling it with water.
Poke several small holes at the bottom to release the dirty water.
 Once cleaning is complete, I poured them into the new grow bed.
Aaah~~! A new grow bed filled with fresh growing media!

Virgin Grow Bed!
 I then thought about utilizing that empty space underneath the new grow bed. Its a nice shady place protected from falling tree debris from above. The guppies would love it there.

A new location for my guppy tank.
Guppies now enjoy clean water directly from the grow bed. Excess water is drained back into the tilapia tank.
A Tee-connector divides the water flow in to both beds.

Thanks for reading!
Read more

Minggu, 29 Mei 2016

A Miracle grow called Organic Potting Soil The best soilless potting Mix

,
Potting mix or potting soil refers to the media people use to grow vegetables, plants etc in containers. It is generally used as an substitute to soil for growing plants.

What are the components: 
organic potting soil miracle grow

The life of the potted plant depends on a large extent to the quality of its potting soil. So choosing right kind of potting mix is essential. There are various ingredients which are generally used as potting soil. To prepare the best potting soil you need to know the ingredients well. Here are some of the popular ones:

Coconut coir: It is generally marketed in the form of compressed bales. Prior to using it you need to add some water.It is made of coconut husk. More on this in this article.

Peat moss: It used to be the most common type of potting soil but due to problems like environmental issues now-a-days its use got reduced a bit. There can be different types of peat moss, the most common is sphagnum peat. Peat moss is not very good for re wetting. More on peat moss is here.

Soil: Now a days most people avoid this media to prepare any potting mix. Though it has more inbuilt organic nutrients than most of other media, the problem is endless. Using soil can increase the total weight of the mix, and make it prone to water logging. Also normal soil contains weed seeds and pathogens which need to be removed first.

Vermiculite: It is a very efficient product for using in smaller containers. It is prepared by treating mica. Vermiculite is very light in weight and has a very good water absorption capability. More on vermiculite is here in this article.

Perlite: it is basically volcanic ash. Finer the grain larger its capacity to hold the water. It is neutral to slightly alkaline in nature and is a good way to reduce acidity of the potting mix. Perlite is dangerous to handle as its dust is highly irritating to lungs. Use proper precaution before handling . Interested in Perlite? Find out more in this article.

Sand: It is generally used to increase the porosity of the mix. It also increases the weight of the mix. It is a great ingredient in case you are planning to grow cactus and other succulents.

Wood chips: Sometimes wood chips, pine bark etc are also used as ingredient to potting mix.

Characteristics of a good potting soil:

  1. good porosity: the best potting soil general has AFP or air filled porosity range between 10 to 20.
    Miracle grow organic potting soil
  2. Fast absorption of water: It should absorb water pretty fast.
  3. light weight: Potting mix is used for planting in containers. So it should be light weight so that the shifting of pots can be done very easily. For this purpose in most cases people use soilless potting mix.
  4. You should select the ingredients which are readily available to you and are not very expensive.
  5. Potting mix needs to be weed and Pest free. In most of the cases it is sterilized. It should also not contain any toxic substances or extra nutrients or salts.
  6. The ingredients should be such that you can easily store them. For example you can store coconut coir in bales form easily for a few years.

There are various types of potting mix available in the market. Some of these are:

Potting mix for every plant: This type of organic potting soil can go with most of the plants and vegetables. The pH of the mixture is slightly acidic to neutral. Mix coconut coir with perlite or vermiculite in the ratio of 3:1 for this.

Acidic potting mix: These type of mix is generally for the plants which love acidic medium. Ideal mixture would be to add organic matter such as peat moss and perlite or vermiculite in 4:1 ratio.

Cactus friendly mix: Cactus and other succulents require very good drainage. Due to this reason the potting mix needs to be with extra drainage facility. Add a little bit of sand along with coconut coir and perlite to make a proper mix.

Seed starters mix: For seed starters add coconut coir and perlite or vermiculite in 2:1 ratio. Many people prefer peat moss in place of coir. In case of peat moss the ratio would be much lower.


What is your experience with potting mix? Would you like to share some of your ideal mixes? Feel free to use the comment box below:
Read more

Selasa, 10 Mei 2016

Easiest Vegetables to Grow for the Beginners

,

As a beginner, most of us are worried about the success of our gardening endeavor. Will we get our desired results? Or will our effort will turn out to be a fruitless labor? As I always emphasis on the point to start small and gradually increase the level of difficulty as you gain experience with gardening. In this article I have mentioned few of the plants which are easy to start. Though these are not totally full-proof, you can definitely try your luck with these plants than to attempt the plants which need much more sophisticated approach, particularly at the beginning.

Tomato:
When we talk about starting your own kitchen garden, may be 80% of us first think about fresh, homegrown tomatoes into our garden. Growing tomatoes are not difficult either. With fertile soil, Little bit of watering from time to time(see watering guide) and lot of sun light, your tomato plant will grow and give you fruits all year long(depending on the variety). Just look out for blight signs and little caterpillars which can hamper the growth of your tomato plant.
Tomatoes are packed with plenty of iron, magnesium, potassium, vitamin A, B6, and C and last but not the least Lycopene(antioxidant) which prevents cancer. you can check tomato growing tips for more in detail.

Pea:
The tender sweetness of pea just plucked from you kitchen garden, is so much better when you compare it with the pea from the store. Most of the varieties can be grown very easily from the seeds. You can grow peas in the containers that is at about 10’’ deep. Peas are easy to care and much fun for kids to harvest them. Just try not to harvest peas in the hot environment(ideal range 40-85 degrees Fahrenheit).
Peas are high in fiber, iron and various vitamins.

Radish:
Radish is another vegetable which is ideal for the starters. The seeds can be sown outdoors, indoors or in the containers. In case you have fertile soil extra feeding are rarely necessary. They can mature withing 25-50days (depending on the variety). They can add a peppery addition to our favorite salads. Want to know more about growing radish? Check out this article.

Carrots:
They are the sweetest, crunchiest and in best condition when taken out from your own garden. Carrots are easy to grow. They need only water,sunlight and careful weeding. Carrots are the tastiest when harvested small. If you leave them in the ground for too long it can result in overly large and woody carrots. Make sure to keep the soil moist. Dry soil can result in bitter and more fibrous carrots. Make sure that the soil is free from rocks and deep enough to handle root growth. Presence of rocks can result in crooked carrots which though are taste wise perfect but aesthetically not soothing. Want to know more about growing carrots. Check out this article.

Spinach:
Leafy green plants such as spinach can be grown very easily from seeds. Cool and moist weather are better for spinach. It is better to sow the seeds 4-5 weeks before the winter. In fertile soil, it can grow very rapidly. It takes one and a half month to mature. Once the the leaves are of reasonable size you can pick them to encourage new growth.
Spinach is high in iron and can be a wonderful addition to salads and soups. want to know more about growing spinach? check out this article.

Cucumber:
Cucumber can be sown in containers, garden, hills almost anywhere. Warm weather, regular sunlight and watering is enough to yield high quality cucumber. You need to provide the plants with ample space to stretch their roots as the plants sprawl. Avoid planting cucumber at the time of frost.
It is a must addition to our salads. For details on  how to grow cucumber click here

Beans:
Almost any type of beans are easy to grow from seed. Plant directly into the soil or the container when the soil is warm. It requires plenty of water, ample sunlight and some cage to provide the support for the vines to grow.
Beans are the powerhouse in terms of nutritional value. They are high in iron, fiber, protein, manganese and phosphorous.


I hope you got some idea about what to plant as a beginner. There might be plenty of other such plants which you have experience as easy to grow and maintain. I will be really happy if you can share some more.
Read more

Kamis, 05 Mei 2016

Grow Garlic A useful plant In Companion Planting

,


A nickel will get you on the subway, but garlic will get you a seat.

Once we discuss growing ginger, garlic is not very far behind. Today we will discuss about Garlic.

Botanical name: Allium sativum

There are basically 2 varieties of Garlic are available.

Soft-neck variety: in this type of garlic the neck of the garlic stay soft after harvest. This variety is the easiest to grow. This variety is also recommended particularly for the warmer climatic areas.

Hard-neck variety:here garlic has a stiff stem that dries to a rigid stick. And it makes braiding almost impossible.

Garlic is grown from the cloves. For growing, you need to plant the cloves into the ground with root end down and pointed end up. Break the cloves from the bulb but do not remove the papery husk which surrounds individual clove. Put the cloves two inch inside the soil with 6 to 8 inches apart. Each clove will produce a single bulb and the largest clove generally produces the largest bulb. If you planting the clove into normal soil and not in any soil-less media, it is better to soak the cloves in water containing baking powder and liquid seaweed to prevent fungal diseases.

Planting cloves from the grocery store can be a bad idea. They are generally treated with various chemicals to make their self life longer. Instead try your local nurseries or seed selling companies for the cloves.

Make sure your soil has plenty of organic matter. To increase the fertility you can always add compost to the soil. Select a place where the sun exposure is good. Garlic requires plenty of nitrogen so choose your compost ingredients accordingly.

Once you planted the cloves cover it with mulch. If you are new to mulching, and want to know more about it, check out this article. After 6 to 8 weeks, depending on the variety and the weather, you will find the shoots coming up through the mulch.  Water requirement of garlic is normally not huge. Inch deep water in every week is more than enough. Stop water once the leaves begin to yellow. This will help to make the bulbs firm.

Garlic has very few pest problems. Rather it is a pest repellant. That is why in organic pest controlling methods, using garlic is a common phenomenon.

You can harvest the garlic once three-quarter of the leaves become yellow. Dig up all the bulbs and get them out of the sun immediately. Keep them in dry and shaded place for six weeks. Once they become thoroughly dry trim the roots. Cut off the stalk 1 inch above the bulb. Now you can use your garlic.


Apart from its intense flavor and culinary uses it is very good insect repellant and thus used widely in companion planting. More about companion planting and its benefits check out this article.

Do you have Suggestions. Feel free to post it.
Read more
 

Aquaponics Build Copyright © 2016 -- Powered by Blogger